[Vue.js] Vue Kakao 지도 구현 04 - Polyline 01
Vue.js 기반 프로젝트에서 Kakao 지도 api에서 제공하는 Polyline을 사용해서 경로를 생성합니다. 생성할 경로 정보를 담당할 클래스 Segment를 작성해서 경로 생성 및 수정 삭제등의 기능을 추가합니다.
[Vue.js] Kakao 지도 Polyline 으로 경로 생성
Section 1에서는 소스코드를 첨부합니다.
Section 2에서는 코드에 대해 설명합니다.
1. 소스코드
프로젝트 구조[PROJECT_ROOT]
  +- public
  |   +- index.html
  |
  +- src
  |   +- App.vue
  |   +- main.js
  |   +- segment.js
  |
  +- package.json
- index.html - vue cli 로 프로젝트 생성시 제공되는 템플릿용 html파일
- main.js - 애플리케이션 entry point
- App.vue - 애플리케이션 Root Component
- segment.js - Polyline을 사용해서 경로를 관리하는 기능
1.1. index.html
kakao 지도를 사용하기 위한 api key를 사용해서 지도 라이브러리 js를 import 합니다.
HTML<!DOCTYPE html>
<html lang="">
  <head>
    <meta charset="utf-8" />
    <meta http-equiv="X-UA-Compatible" content="IE=edge" />
    <meta name="viewport" content="width=device-width,initial-scale=1.0" />
    <link rel="icon" href="<%= BASE_URL %>favicon.ico" />
    <title><%= htmlWebpackPlugin.options.title %></title>

    <!-- 지도 라이브러리 import -->
    <script
      type="text/javascript"
      src="//dapi.kakao.com/v2/maps/sdk.js?appkey=[여기에 api key 입력]"
    ></script>

  </head>
  <body>
    <noscript>
      <strong
        >We're sorry but <%= htmlWebpackPlugin.options.title %> doesn't work
        properly without JavaScript enabled. Please enable it to
        continue.</strong
      >
    </noscript>
    <div id="app"></div>
    <!-- built files will be auto injected -->
  </body>
</html>
- 카카오 개발자 센터에서 앱 생성 후 api key를 가져옴
1.2. main.js
vue cli로 프로젝트를 만들때 생성되는 파일을 그대로 사용합니다.
JAVASCRIPTimport Vue from "vue";
import App from "./App.vue";

Vue.config.productionTip = false;

new Vue({
  render: (h) => h(App),
}).$mount("#app");
- 따로 건드린게 없음
1.3. App.vue
vue cli로 프로젝트를 만들때 생성된 파일을 지우고 지도 화면으로 구성
App.vue<template>
  <div id="app">
    <div class="path-list">
      <h3>경로</h3>
      <button @click="processNewPath()">새로운 경로</button>
      <div class="list-of-seg">
        <div class="segment" v-for="(seg, index) in segments" :key="index">
          <h4>{{ seg.name }}</h4>
          <!-- 경로 이름 필요함-->
        </div>
      </div>
    </div>
    <div class="map-wrapper" ref="kakaomap">
      <button class="btn-commit-seg" v-if="activeSegment" @click="commitPath()">
        종료</button
      ><!--경로 종료할때 버튼-->
    </div>
  </div>
</template>

<script>
import startSegment from "./segment";

export default {
  name: "App",
  components: {},
  data() {
    return {
      mapInstance: null,
      activeSegment: null,
      segments: [], // list of pathes
    };
  },
  mounted() {
    // init map here
    var container = this.$refs.kakaomap;
    var options = {
      center: new window.kakao.maps.LatLng(33.450701, 126.570667),
      level: 3,
    };

    this.mapInstance = new window.kakao.maps.Map(container, options); //지도 생성 및 객체 리턴
  },
  methods: {
    processNewPath() {
      console.log("[new path] start");
      // 지도 객체 전달
      this.activeSegment = startSegment(this.mapInstance);
    },
    commitPath() {
      this.activeSegment.commit();
      this.segments.push(this.activeSegment);
      this.activeSegment = null; // 버튼 사라지게 함
    },
  },
};
</script>

<style lang="scss">
html,
body {
  height: 100%;
  margin: 0;
}
#app {
  font-family: Avenir, Helvetica, Arial, sans-serif;
  -webkit-font-smoothing: antialiased;
  -moz-osx-font-smoothing: grayscale;
  color: #2c3e50;
  height: 100%;
  display: flex;
  .path-list {
    width: 240px;
  }
  .map-wrapper {
    flex: 1 1 auto;
    .btn-commit-seg {
      position: absolute;
      top: 5px;
      left: 5px;
      z-index: 1000;
    }
  }
}
</style>
1.4. segment.js
Kako 지도 api에서 제공하는 Polyline 을 사용해서 경로를 관리하는 역할
segment.jsconst DEFAULT_KAKAOMAP_CURSOR =
  'url("http://t1.daumcdn.net/mapjsapi/images/cursor/openhand.cur.ico") 7 5, url("http://t1.daumcdn.net/mapjsapi/images/cursor/openhand.cur.ico"), default';
/**
 * 경로를 나타내는 클래스
 */
class Segment {
  /**
   *
   * @param {kakao.maps.Map} mapInstance 지도 인스턴스
   * @param {object} props 경로 메타 정보들(이름 거리 등...)
   */
  constructor(mapInstance, props) {
    this.map = mapInstance;
    this.done = false;
    this.points = []; // list for LatLng
    this.poly = new window.kakao.maps.Polyline({
      map: this.map,
      path: [],
      strokeWeight: 2,
      strokeColor: "blue",
      strokeOpacity: 0.8,
      strokeStyle: "solid", // 실선
    });
    this.listeners = { click: null };
    this.props = props || {};
    this.installListeners();
  }
  get name() {
    return this.props.name || "NO NAME";
  }
  installListeners() {
    // 클릭 리스너 등록
    const adder = (e) => {
      console.log("[pos]", e.latLng);
      this.points.push(e.latLng); // 각 점을 등록
      this.render();
    };
    this.listeners.click = adder;
    window.kakao.maps.event.addListener(this.map, "click", adder);
    this.map.setCursor("crosshair");
  }
  render() {
    // 경로를 그림
    this.poly.setPath(this.points);
  }
  commit() {
    // 경로 작성 완료
    this.done = true;
    // 리스너 해제해야함
    window.kakao.maps.event.removeListener(
      this.map,
      "click",
      this.listeners.click
    );
    // 커서를 가져오는 API가 없습니다.
    // 걍 이렇게 받아놓고 복구시킴
    this.map.setCursor(DEFAULT_KAKAOMAP_CURSOR);
    console.log("[해제 완료]");
  }
}

let currentSegment;
const startSegment = (mapInstance) => {
  currentSegment = new Segment(mapInstance);
  return currentSegment;
};

export default startSegment;
2. 구현 설명
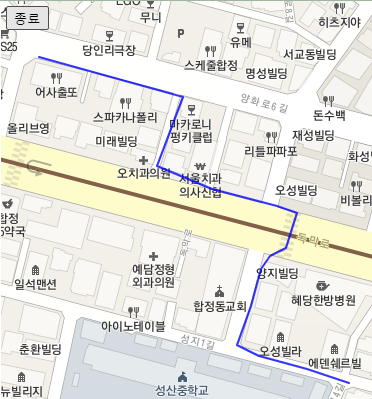
아래와 같이 경로를 생성하는 간단한 애플리케이션입니다.
- 지도내 버튼을 눌러 경로 생성을 시작함
- 경로에 추가하고 싶은 위치를 클릭, 클릭, 클릭
- [종료] 버튼을 눌러 경로 생성을 마침
- 생성된 경로가 왼쪽 화면에 나타남
2.1. 경로 시작 버튼
새로운 경로 생성을 위해서 아래와 같이 버튼에 click 리스너를 등록합니다.
App.vue<template>
  <div id="app">
    <div class="path-list">
      <h3>경로</h3>
      <button @click="processNewPath()">새로운 경로</button>
      ....
  </div>
</template>

<script>
import startSegment from "./segment";

export default {
  ...,
  data() {
    return {
      ...,
      activeSegment: null,
      ...
    };
  },
  methods: {
    processNewPath() {
      console.log("[new path] start");
      // 지도 객체 전달
      this.activeSegment = startSegment(this.mapInstance);
    },
    ...
  },
};
</script>
- @click="processNewPath()" 버튼 클릭시 경로 생성 시작
- processNewPath() 에서는 segment.js 에 정의된 startSegment를 호출해서 경로를 나타내는 인스턴스(class Segment)를 반환받음
- 참조를 activeSegment 변수에 바인딩해둠
2.2. 경로 생성
실제로 경로를 생성하고 관리(수정 및 삭제 등)하는 일은 segment.js 에서 담당합니다.
이 파일에는 Segment라는 클래스를 정의해서 경로관련 관리 기능을 은닉합니다.
JAVASCRIPT/**
 * 경로를 나타내는 클래스
 */
class Segment {
  /**
   *
   * @param {kakao.maps.Map} mapInstance 지도 인스턴스
   * @param {object} props 경로 메타 정보들(이름 거리 등...)
   */
  constructor(mapInstance, props) {
    this.map = mapInstance;
    this.done = false;
    this.points = []; // list for LatLng
    this.poly = new window.kakao.maps.Polyline({
      map: this.map,
      path: [],
      strokeWeight: 2,
      strokeColor: "blue",
      strokeOpacity: 0.8,
      strokeStyle: "solid", // 실선
    });
    this.listeners = { click: null };
    this.props = props || {};
    this.installListeners();
  }
  get name() {
    return this.props.name || "NO NAME";
  }
  installListeners() {
    // 클릭 리스너 등록
    const adder = (e) => {
      console.log("[pos]", e.latLng);
      this.points.push(e.latLng); // 각 점을 등록
      this.render();
    };
    this.listeners.click = adder;
    window.kakao.maps.event.addListener(this.map, "click", adder);
    this.map.setCursor("crosshair");
  }
  render() {
    // 경로를 그림
    this.poly.setPath(this.points);
  }
  commit() {
    // 경로 작성 완료
    this.done = true;
    // 리스너 해제해야함
    window.kakao.maps.event.removeListener(
      this.map,
      "click",
      this.listeners.click
    );
    // 커서를 가져오는 API가 없습니다.
    // 걍 이렇게 받아놓고 복구시킴
    this.map.setCursor(DEFAULT_KAKAOMAP_CURSOR);
    console.log("[해제 완료]");
  }
}
이 클래스는 현재 "경로 생성" 기능만 구현되어 있지만 나중에 만들어진 경로를 수정하거나(위치를 추가, 변경) 삭제하는 기능도 담당합니다.
경로를 생성하는동안 지도 화면에 리스너를 등록하고 다시 해제하는 등의 "상태"를 관리하는 일을 담당합니다.
- 경로 생성시 커서를 바꾸고 싶다
- 편집시 각 위치마다 클릭할 수 있는 마커를 그려주고 싶다.
이때문에 별도의 클래스를 정의해서 다양한 상태 조작 구현을 외부에 노출하지 않도록 합니다.
App.vue에서는 아래와 같이 새로운 경로를 시작합니다.
App.vue  methods: {
    processNewPath() {
      console.log("[new path] start");
      // 지도 객체 전달
      this.activeSegment = startSegment(this.mapInstance);
    },
    ...
  },
segment.js 의 startSegment에서는 전달받은 kakaomap 지도 인스턴스를 Segment 클래스의 생성자로 넘겨서 인스턴스를 생성합니다.
Segment constructorclass Segment {
  /**
   *
   * @param {kakao.maps.Map} mapInstance 지도 인스턴스
   * @param {object} props 경로 메타 정보들(이름 거리 등...)
   */
  constructor(mapInstance, props) {

    this.points = []; // list for LatLng
    this.poly = new window.kakao.maps.Polyline({
      map: this.map,
      path: [],
      strokeWeight: 2,
      strokeColor: "blue",
      strokeOpacity: 0.8,
      strokeStyle: "solid", // 실선
    });

    ...
    this.installListeners();
  }
  ...
}
- this.points - 화면에서 클릭한 위치(위경도)들, kakao.maps.LatLng 타입의 인스턴스들을 담아둡니다.
- this.poly - 경로를 나타내는 인스턴스. path: [] 으로 비워두고 화면을 클릭하면 그때그때 경로 정보를 새로 렌더링하게 됨
installListener() 에서는 지도에서 클릭한 위치 정보를 경로에 추가하기 위한 click listener를 등록합니다.
Segment.installListenerclass Segment {
  ...
  installListeners() {
    // 클릭 리스너 등록
    const adder = (e) => {
      console.log("[pos]", e.latLng);
      this.points.push(e.latLng); // 각 점을 등록
      this.render();
    };
    this.listeners.click = adder;
    window.kakao.maps.event.addListener(this.map, "click", adder);
    this.map.setCursor("crosshair");
  }
}
- const adder = (e) =>{...} 이곳에서 클릭한 위치값(위경도)을 this.points에 등록하고 render()를 호출해서 경로를 화면에 새로 그려줍니다.
- crosshair - 정확한 등록을 위해서 십자가 모양으로 커서를 변경함
kakao 지도 api를 찾아보면 경로를 새로 그릴때에 갱신된 경로 정보를 배열에 담아서 넘겨주라고 나와있습니다.
Segment.render  render() {
    // 경로를 그림
    this.poly.setPath(this.points);
  }
- api에 나온대로 사용한 모습
2.3. 경로 완료
지도 화면에서 [종료]를 눌러서 생성을 종료합니다.
경로 생성을 마칠때 다음과 같은 후처리를 해야 합니다.
- 지도에 등록한 click listener를 다시 제거해야 합니다.(그렇지 않으면 지도를 클릭할때마다 계속 경로에 추가됨)
- 커서를 원래대로 되돌려야 함
이러한 작업은 commit() 메소드에서 담당합니다.
Segment.commitclass Segment {
  ...
  commit() {
    // 경로 작성 완료
    this.done = true;
    // 리스너 해제해야함
    window.kakao.maps.event.removeListener(
      this.map,
      "click",
      this.listeners.click
    );
    // 커서를 가져오는 API가 없습니다.
    // 걍 이렇게 받아놓고 복구시킴
    this.map.setCursor(DEFAULT_KAKAOMAP_CURSOR);
    console.log("[해제 완료]");
  }
}
여기서 문제는 kakao 지도 api에서 현재 커서를 가져올 수 있는 방법이 없다는 것입니다.
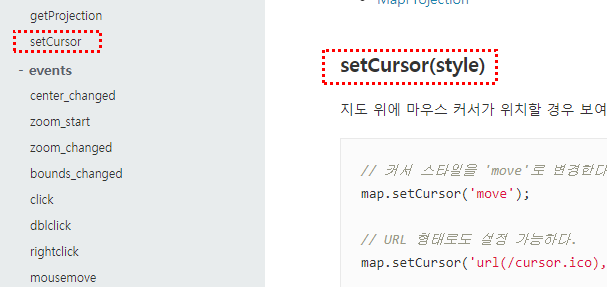
- getCursor가 없음
이 문제를 해곃하기 위해서 브라우저 DevTool을 이용해서 직접 커서에 해당하는 스타일 값을 얻어내서 변수로 저장해둡니다.
커서에 해당하는 css 값const DEFAULT_KAKAOMAP_CURSOR =
  'url("http://t1... .cur.ico") 7 5, url("http://t1...cur.ico"), default';
완성된 경로는 App.vue에서 배열에 담아서 화면에 그려줍니다.(v-for 등으로 목록 출력)
App.vue<template>
  <div id="app">
    <div class="path-list">

      ...
      <div class="list-of-seg">
        <div class="segment" v-for="(seg, index) in segments" :key="index">
          <h4>{{ seg.name }}</h4>
          <!-- 경로 이름 필요함-->
        </div>
      </div>

    </div>
    <div class="map-wrapper" ref="kakaomap">
      <button class="btn-commit-seg" v-if="activeSegment" @click="commitPath()">
        종료</button
      ><!--경로 종료할때 버튼-->
    </div>
  </div>
</template>

<script>
import startSegment from "./segment";

export default {
  ...
  data() {
    return {
      ...
      activeSegment: null,
      segments: [], // list of pathes
    };
  },
  mounted() {...},
  methods: {
    processNewPath() {...},
    commitPath() {
      this.activeSegment.commit();
      this.segments.push(this.activeSegment);
      this.activeSegment = null; // 버튼 사라지게 함
    },
  },
};
</script>
- @click="commitPath()" 종료 버튼을 누르면 메소드 실행
- commit()을 호출해서 리스너 등을 해제함
- 배열 this.segments 에 담아줍니다.
this.activeSegment를 null로 변경하면 종료 버튼에 정의한 v-if 조건문에 걸려서 화면에서 사라집니다.
HTML <button class="btn-commit-seg" v-if="activeSegment"...>종료</button>
- null 도 false로 취급됨(js 문법)